COMPUTER PROCESSING of IMAGES

I shoot all pictures in RAW format.   There is plenty of information elsewhere on the web to explain and justify this over the JPG format, so I will not elaborate.   I process my images on either an iMac or a MacBook.   After downloading image files to the computer I screen them using Adobe Bridge.   That done, the procedure used to be conversion of RAW files using Adobe Camera Raw for processing in Photoshop, but I have had to change that as explained below.   There are alternatives to Photoshop and if I were starting from scratch I would explore them, but I have been using Photoshop for over 20 years and it meets all my requirements and I am comfortable with it.   But circumstances are making it progressively more difficult.

I purchased my version of Photoshop - CS6 - outright and it wasn't cheap.   Shortly after that Adobe changed its policy forcing users of the next upgraded version to pay a monthly subscription for continued use of the product.   Having recently shelled out several hundred pounds for CS6, I was reluctant to pay a monthly 'rental' for the new Photoshop CC.   That caused me no problem initially; I like CS6 and it does all I need to do, until I upgraded my camera to the Canon 5D MkIV.   That needed a new version of Adobe Camera Raw to convert the images to a Photoshop-readable format.   But the people at Adobe - God bless them - decided that they would only provide the Camera Raw upgrade for users of Photoshop CC.   They did make available, free of charge, an app called DNG Converter, which converts RAW files to a format that makes them readable by the 'old' version of Adobe Camera RAW.   It does that without allowing any control of the process.   Quite frequently I didn't like the results.   The images were sharp and technicallly satisfactory, but the colour balance, colour depth and contrast were sometimes poor.   Fortunatley Canon provide a program called DPP (Digital Photo Professional), which comes on a CD with Canon DSLR cameras or can be downloaded from the web free of charge.   This can be used to convert any Canon RAW files to the TIFF format, which can then be read by either Adobe Camera RAW or by Photoshop itself.   It gives much better results in converting RAW files, so that is what I now use.

This gives me a post-production shedule as follows....(1) Load images into the computer as RAW files. (2) Batch process the images to TIFF files using Canon DPP. (3) Screen the TIFF files in Adobe Bridge. (4) Upload selected files into Photoshop via Adobe Camera RAW.   The last step is preferable to direct input of TIFF files into Photoshop, because it allows for adjustment of exposure, contrast, vibrance, individual colour balance and some suppression of noise.   True, it is a laborious procession of steps, and I am sure that some people would suggest that Lightroom is quicker and more efficient, but if it ain't broke....

I regularly use a couple of techniques that have proved valuable, so I will give more information about noise removal and, further down the page, focus stacking to increase depth of field when photographing moths.

Noise removal

Neat Image (http://www.neatimage.com) is a most effective and useful piece of software for removing noise from digital images and I recommend it without reservation.   I use the Photoshop plug-in version.   I guess that the purists would argue that, if you get everything right, you do not need noise reduction software, but you cannot always get everything right.   It is important to check for noise when converting the RAW image in Adobe Camera RAW.   If the exposure is good and the noise is modest, then this may be all the correction needed.   In the Camera RAW edit window you select the DETAIL tab (coded with two triangles, one hard, one soft); the noise reduction sliders are at the bottom of this tab.

If light conditions are bad or you make a mess of the exposure, then you may need a more radical solution.   The images below illustrate this.   The shot of a Barn Owl was taken at about 4.00pm on a February afternoon in Norfolk.   To quote baseball player Yogi Berra, it gets late pretty early over there.   As you might guess the light was poor.   The shot was hand-held (Canon 50D, 400mm), the Barn Owl was not going to hang about, so neither could I.   I began with a high ISO value to give a fast shutter speed and reasonable depth of field - the owl was fairly close - intending to take more shots at a lower ISO setting.   I got some shots off at 1250 ISO, gving a 650th at f8.   Before I could reduce the ISO and try again, the owl departed across a field, so that was that.   As you can see from the unedited picture the noise was awful.

Setting the sliders for aggressive removal in Neat Image removed all the noise, but also took detail out of the image and left it looking "glassy".

This was no good; time to use masks in Photoshop.   To understand this you need to be familiar with layer masks and I recommend one of the many video tutorials that can be easily found on the web.   The first step was to remove as much noise using Neat Image as I was prepared to tolerate, without losing image detail, using the facial plumage as a guide.

That done, I decided to bring out the detail in the eyes before tackling the noise further.   I made a copy layer, adjusted the shadows in that layer only to reveal the lights and reflections in the eyes. I then made the original into a layer mask over the top of the 'bright eyes' layer and painted out the eyes in the mask to allow the lightened ones to show through.   I then flattened the image.

Next I copied the layer again, left the original on top as a mask and used Neat Image very aggressively on the layer below.   The object here was to remove all the noise from the background without worrying about the bird or the fence-post.   This time I painted out all the background from the layer mask plus the metal ring on the bird's foot.   This removed all the noise from the parts of the picture containing no detail and the flattened image was as good as I could get.   It produced a pretty good A4 print.

You can see the full picture at lower resolution on the OWLS page, but the comparison below shows the improvements produced by the edits described above.   I have used layer masks on other pictures, more to enhance eye detail than for selective noise removal.   Birds with dark eyes surrounded by dark plumage can look strange if the eyes 'disappear'.   I used this approach with Little Gull and Spur-winged Lapwing (see Gulls and Waders pages).


Focus stacking

This is of limited and special use, but when appropriate, it is invaluable.   The principle is that you take two or more photographs of the same subject, without movement of either subject or camera, nor any adjustment of lens zoom.   The result is that it should be possible to perfectly superimpose the pictures.   However, the aim is to adjust the focus between taking the images, so that the range of images covers all the planes of focus of the subject.   In other words, each part of the image will be perfectly sharp in at least one of the pictures.   That done, the computer constructs an amalgamated image from the stack of photographs, such that it selects the sharpest parts in each and the amalgam is perfectly sharp in its entirety.

I use this procedure for almost all my photographs of moths taken from my light trap in the morning (see Photographing Moths page).   In this instance, the moths are normally “asleep” and perfectly stationary and the camera is clamped on a sturdy tripod.   The technique would also be useful for flowers, provided that there is no wind or they can be made stationary by some means.   Its particular value for moths comes from the fact that, in plan or overhead view, the larger insects have too much depth to focus all elements in a single shot, even with the smallest aperture and, hence, maximum depth of field.   In practice, with the lens stopped down to f14, I find that three photographs are usually adequate for middle-sized moths and four for the large species.   For small geometrids, with a flatter profile, two images usually suffice.   The technique is of particular value for hawkmoths because, in addition to having large bodies, they sometimes hold their wings up at a slight angle.

So, the procedure begins with the acquisition of a stack of images, identical except for the plane of focus of the camera.   You need to be able to focus very precisely and Live View (Canon jargon for visualisation of the image on the rear screen, rather than the viewfinder) helps with this, especially if the rear screen image can be magnified.   I take one image with the crown of the moth’s thorax sharp, then a series of refocussed images, with the final one of the wingtips and legs that are in contact with the substratum.

I have tried two methods of focus stacking in the computer.   The most straightforward is in Photoshop (the description below works for CS4 and CS6; I am not sure if it differs in older versions).   The procedure is as follows.

1. Import into Photoshop all the images that you want to stack, using similar corrections from the RAW files.   Drop down the Arrange Documents icon and select multiple images as appropriate, so that you can see all the images that you have imported.

2. Reduce the view (hold down both Ctrl and the minus key) of all images so that the whole of each is visible.

3. Suppose, for example, you have three images....with the Rectangular Marquee tool select the whole of image 2, then copy it to the clipboard (Edit>Copy).   Activate image 1 and paste image 2 into it (Edit>Paste).   This will show up as a new layer in image 1.   Repeat the procedure with image 3, pasting it into image 1 and giving three layers in image 1.

4. Now activate all three layers in image 1.   The next step is to align all the images before blending them; so select Auto-align Layers from the Edit menu (note that this option is not visible unless more than one layer is activated).   This will open a pop-up window offering you six choices under the heading of Projection - select Auto, if it is not selected by default, and leave the two Lens correction options unchecked (these are for aligning and blending wide-angle lens panoramas).   Click on OK.   Once this procedure has completed, you can blend the layers.   So, select Auto-blend Layers from the Edit menu.   This will bring up a new box in which you have two choices – Panorama or Stack Images – select Stack Images (if not selected by default) and make sure that the box marked Seamless Tones and Colors is ticked.   Now click OK and the program will generate your amalgamated image from the stack (replacing image 1).   Finally, select all three layers and then flatten the image.   You can then process this image (sharpening, etc) as any other, but don’t forget to rename it if you want to keep the original stack.

Note that this procedure requires a lot of memory, so you need to ensure that Photoshop is set up for optimal memory use - go to Edit-Preferences-Performance and follow the recommendation for about 1180 MB of RAM.   Depending on the size of your computer's RAM, you may also need to close other programs (NOT your anti-virus) and the Photoshop image files that you are not using for the align-blend procedures.   Once you have copied and pasted the series of images as new layers in the "master" image (the one that you will align and blend), you can close the others.   If you still get an error message stating that there is not enough RAM, you will need to crop or reduce the size of the images in your stack.   In extremis, for eaxample when dealing with a stack of 6 images, you could align and blend together 1, 2 and 3 first, then 4, 5 and 6, as two separate operations, finally blending together the two files thus created.

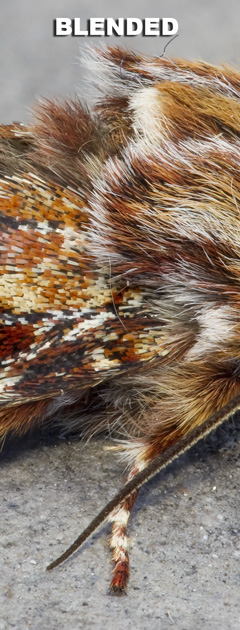
Illustrated example:-


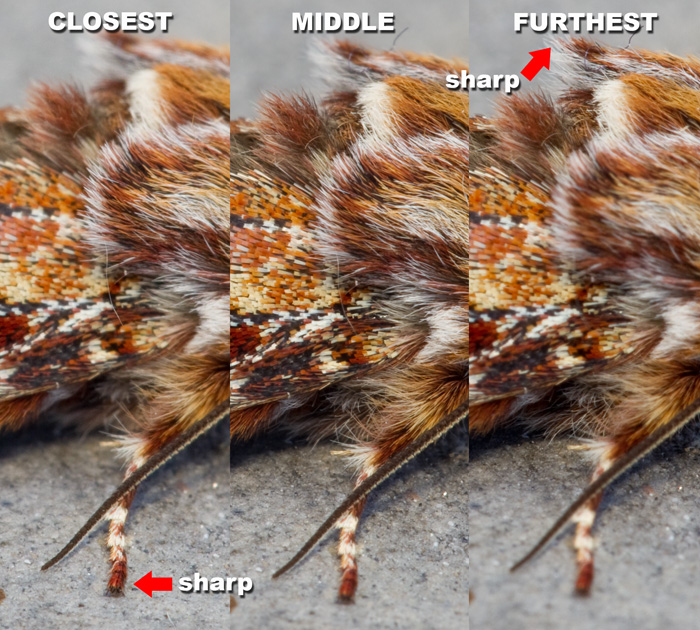
The montage above shows the same field from three images taken of a Pine Beauty moth at f13 and at three different focal planes, but with otherwise identical settings.   In the CLOSEST focussed image the tip of the leg is sharp, in the FURTHEST focussed image the hair tuft on the dorsal thorax is sharp; the MIDDLE image is focussed as implied by the title.   These three were then aligned and blended in Photoshop and the image below shows the same field from the stacked image.   The full image can be seen in the Moths Showcase.