PHOTOGRAPHING MOTHS
There is lots of good advice on the web about photographing birds in the field. There is much less information on techniques for photographing moths and I have learned a lot by trial and error. So, it seems apposite to put some of that learning back, concentrating on things that I wish I had known without the process of discovery by experiment.
So you want to photograph moths?
I am assuming that the moths are acquired via a light trap; indeed if you want to study moths, that is a prime requirement.
When you go to your trap in the morning, examine the surrounding area and the outside surfaces of the trap, before you open it. Some species will not enter the trap and can be found resting outside; this is particularly true of small geometrids. If you try to move these, they will usually fly off, so they must be photographed in situ. To produce a record shot (i.e. the quality doesnt matter much) for identification, the best option is to hand-hold the camera and get the job done. But if you want quality, then you need to use a tripod and cable release as described below, so the first stage is often to manoeuvre things around and get quality images of moths resting outside the trap without disturbing them. That done, if necessary, you move the trap to a convenient place and begin to examine the contents.
There are two main factors to consider for photography - posture (the moth's, not yours) and friskiness (again, the moth's, not yours). Many moths settle with their wings flat: this is true for geometrids, except thorns, and many noctuids and other families. If the moth has this flattened posture, then the classic photo is taken from above, like the arial view of a map. Some families, however, settle in an arched posture (typically hepialidae, plusiinae) and are best photographed from the side. In both cases the rationale is to minimise the depth of field and keep as much of the image as possible in focus. If the moth is frisky, then you must maneouvre it to a suitable site and position without it escaping. Photographs of moths on egg boxes in the trap are not acceptable, except as a matter of record.
If your moth appears to be passive, it can be gently coaxed onto a photogenic surface. As your experience develops, you will recognise the species that are mostly passive and those that tend to fly at the least provocation. Frisky moths must be transferred to a container. The ideal container is a reasonably sized box, with a floor that offers a 'naturalistic', non-distracting background so that the moth can be photographed in the box. So I have lined some containers with a mix of filler and compost (see below for more detail). Suitable containers are sandwich boxes or the plastic boxes used for mixed fruits by supermarkets. I transfer the moth quickly to the container and put on the lid, wait for the moth to settle down and, if it doesn't, put the box in the fridge for a while. When all is calm I remove the lid and photograph the moth in the container against the neutral background of the compost-filler mixture.
If my moth is passsive, then I coax it onto a flat surface if it has a flattened posture and photograph it from above - what you might call 'plan view'. If it has an arched posure, needing 'side view', then I often use logs because I can get an out of focus background - see here for example. For photographs in 'plan view' I usually need the camera pointing vertically downwards and if the moth is in a box, it will need to be placed directly below the camera. Below are illustrations of the type of box that I use and the positioning of the camera using an inverted tripod head for 'plan view'.
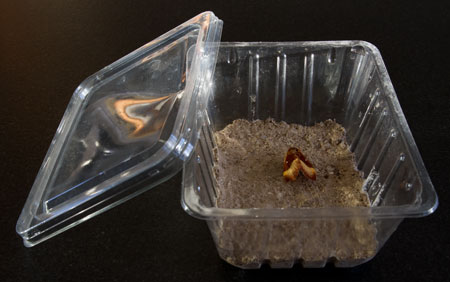
The Cooler. This plastic box previously contained 'summer fruits' from a well-known supermarket. The base contains a 50:50 mix of grey Polyfiller and potting compost. It sets hard and forms a featureless rough base, which retains the low temperature from the fridge and keeps the moth cool, calm and still whilst you photograph it in the box.
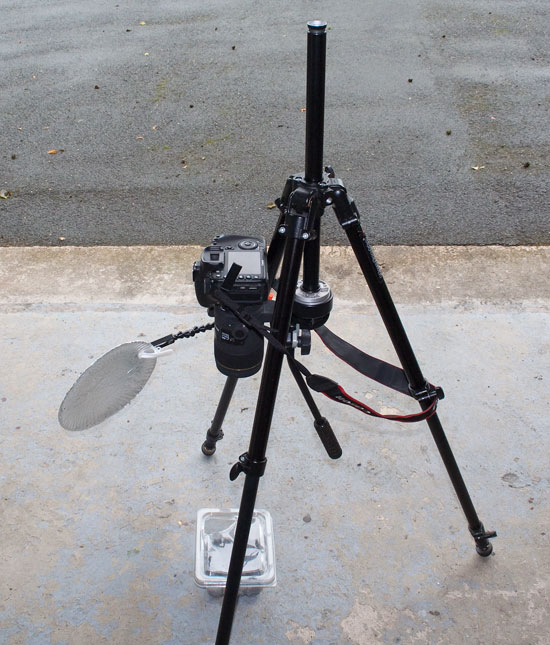
This is the set-up for moths in containers. Most good tripods allow the head to be inverted as shown. The moth is in the container below, the lid is removed, reflector adjusted and the image focussed.
You need a macro lens. Without that, the image is too small and massive cropping is required to give adequate enlargement. Obviously detail is lost. With a macro lens, the depth of field is minute, so as small an aperture as possible is essential. It pays to know the aperture of your lens at which diffraction begins to soften the image; see here, for an explanation of this phenomenon. I use a Sigma 180mm 1:3.5 Apo Macro DG HSM lens, which begins to show diffraction at f16, so f14 is my optimum aperture and I always use Aperture Priority setting. Slow shutter speeds are not a problem - the moth must be stationary, the tripod rock-steady and you use a remote shutter release. So you can select a low ISO value for maximal picture quality. There are many pictures on this site taken at 1/30 second or even slower and they are completely sharp.
Light is not a problem, but avoid direct sunlight. You just need decent, even illumination. Use a reflector to balance the light if one side is darker. You can buy reflectors, but a square of cooking foil scrunched up, flattened out again and taped to a piece of card is fine. You will see the light it reflects by moving the card about and targeting the reflection on the moth. Bright sunlight is a nuisance. First, it gives stark illumination and colours are bleached out in the image. Second, it warms up the moths and they become restive.
I always use manual focussing for moths. My camera has Live View (Canon jargon for the ability to view the live image on the rear screen, rather than the viewfinder), which is an asset. This means that I can compose the field of view, lift the mirror to Live View (if using a DSLR), magnify the image 5 times and then focus very precisely. This gives much better results than any autofocussing. I also regularly use focus stacking to get images in which all parts of the moth are sharp. This technique is explained on the Image Processing page of this site.
Finally, always sharpen the image in the computer. I find that moths give the clearest demonstration of the value of Unsharp Mask in Photoshop. To sharpen a TIFF file of a moth image I take the following steps. Magnify the image to actual pixels, open up Unsharp Mask (Filter>Sharpen). Set Amount to about 300% and start with minimum Radius (0.1) and Threshold (0). Increase the Radius stepwise until you just have maximal sharpness (usually to 0.3-0.4 pixels), then, if this has introduced edge noise, take the Threshold up to 1 or 2. I find that this always improves the image considerably.
Last of all, ALWAYS release your moths into dense foliage and watch out for birds; they will quickly associate your activities with a free breakfast. I remember talking to the gardener of a hotel, who told me that Magpies inspected the hotel sign each morning because moths were attracted to its illumination at night and rested on or near the sign at dawn. I have seen Magpies trying to get at the moths visible through the transparent lid of my trap. Fortunately, they cannot do so and it drives them crazy until they give up and go away.
I hope these points help and wish you good mothing. Please mail any comments or recommended modifications.